If you would like to download this tutorial please visit my new website at http://turtlegirl76.com/free-patterns/
Charted pattern got ya down? Pattern telling you to do X every X number of rows? Tired of writing down on a post-it what row you're on in a pattern? Can't remember if you clicked your Kacha-Kacha or turned your row marker? I have a custom tailored solution for you.
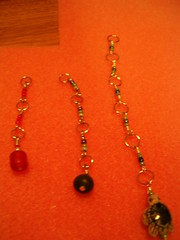
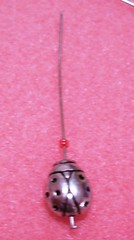
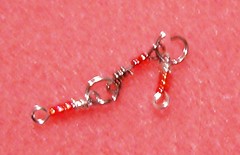
What you see on the right are 3 different pattern row markers. Basically, a chain of stitchmarkers. Each loop represents a pattern row. The top loop would be row #1, the bottom, nearest the big bead, would be the last row in the pattern repeat. If knitting in the round, you would put this in place of your beginning of round marker. If flat, place it after the first stitch on your needle.
From left to right, we have a counter for a 3, 4 and 6 row pattern repeat. Let's fill in the missing link, and make a counter for a 5 row pattern repeat.
Supplies:
Beading tools:
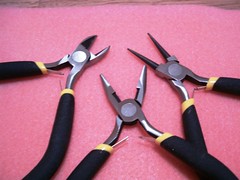
A wire cutter, crimper (or plier), and a round tipped plier.
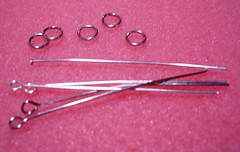
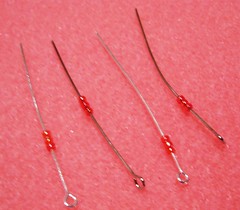
5 Jump ring, 1 head pin and 4 eye pins:
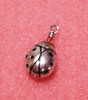
An anchor bead:
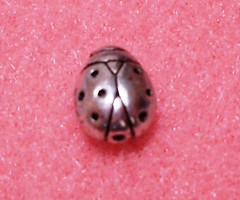
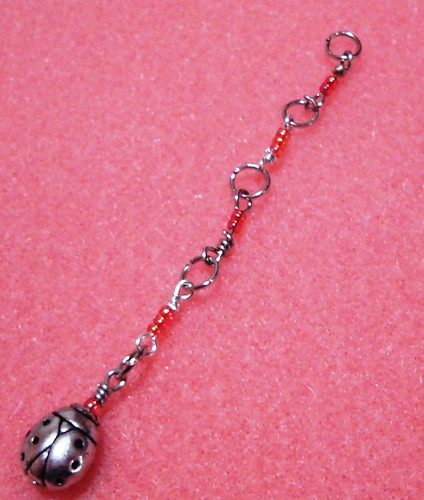
I've chosen this ladybug bead because it has a bit of heft to it. This bead will help keep the counter hanging down and also mark which end is the, well, end.
Seed Beads:
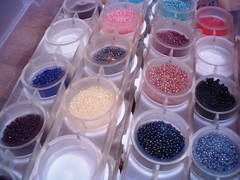
Or you can use beads a bit larger than seed beads, but these work best. For our 5 loop chain, we'll need 13 seed beads.
Step 1:
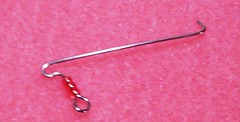
Make the anchor bead.
Take your head pin and slide your anchor bead onto it, and top it off with a single seed bead. We don't want a seed bead on the end because that creates a pokey bit and thus, potential to snag your knitting. No pokey bits please. This is also why we use a head pin rather than another eye pin. We want the end to be nice and smooth.
Make a loop and wrap the end of the pin around itself, cutting off the extra bit and crimping it down so the cut end is not poking out.
Step 2:
Making the chain links.
Take your 4 eye pins and slide 3 seed beads onto each pin. 3 creates the perfect amount of space between each loop in the chain. If 2, 4 or even 5 floats your boat, then great. You may find the distance between each loop is too far though.
Take your round tipped pliers and hold the pin just above the first seed bead. Bend the pin at a 90 degree angle.
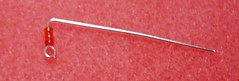
Then, take your crimper pliers and bend the end of the pin 180 degrees back over the round tipped pliers. You'll create a neato loop.
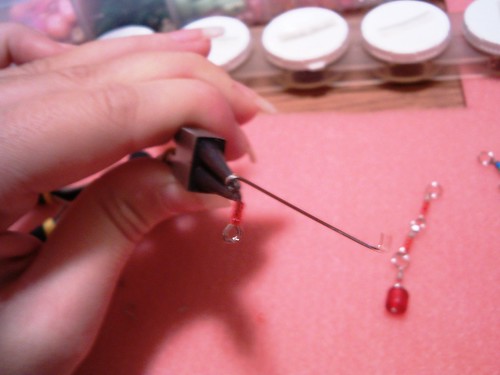
Here it is off the tool:

Then you're going to wrap the free end of the pin back around itself, closing t

he loop. Cut off the extra and crimp down the cut end. Remember, no pokey bits. Rinse, wash and repeat until you have X-1 chain links. (x being the total number of pattern row repeats, in our case, our pattern is 5 rows, so we need 4 of these.)
Step 3:
Chain-chain-chain. Chain of loops.
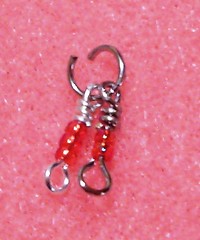
Now it's time to assemble your row counter. Take a jump ring and open it up by twisting the ring's ends away from each other, and to prevent a gap when closing, slightly push each end in a bit.
(Don't open it like a book, open it like a fan.) Slide two chain links onto the ring.
Close the jump ring by twisting the opposite way you opened it. When you pushed in, the ends kinda went past each other, so when you want to close it, the ends should end up touching and closing the ring in a more solid fashion. You'll see what I mean when you do it. Trust me. Repeat this step until all the chain links are attached.
When you run out of links, you'll put a single jump ring on one end of the chain of linked loops, and on the other, we'll attach the anchor bead to the chain with the last jump ring.
You should end up with something like this:
Now you're ready to use your counter. Simply replace your beginning of row marker (for circular knitting) with the counter, and every time you get back to it, poke your working needle into the next loop down on the chain to move it over and start your next row. I love using these for socks. Such a portable project deserves a portable counting system. Simply write your pattern rows down on an index card (if you don't have it memorized) and slip it in your sock bag along with the sock. You have all you need to knit on the go! No need for a pen, kacha-kacha or extra bits of paper, just grab your project and pattern and go!
Please feel free to print out a copy of this post for your own use, but please direct your friends and other knitters you'd like to share this with back here to this post so they can get their own copy. I'd rather you not sell these and reap the rewards of my genius, however, feel free to give these as gifts to your knitterly friends. See this post for a video on bending the wires, and this post for answers to various questions that have been asked about these counters. If you would like to swap for a counter, or a set, please e-mail me at prostiturtle AT gmail DOT com.
28 comments:
What a great idea! Thanks for posting the instructions!
Awesome! We are so going to have to make some of these when you come up!
Now to find some fun anchor beads...
That's a pretty cool idea. I'll bet I could make an ugly one out of just jump rings for those 10+ row repeat designs.
This is a great concept. I'm forever forcing myself to finish the end of a pattern repeat because I know if I leave off in the middle of it, I'll never remember what row I'm on!!!
I'm in awe of your wire bending abilities as well. I can't ever eliminate the pokey bits.
Let me know when you set up shop!
Your work is very neat! The one I have tends to get caught on my yarn.
Wow, thanks for sharing this tutorial!
how fun… so yesterday I made a super ghetto one of these with a paperclip and a beaded stitch marker to keep track of a 2 row pattern in my socks and I thought I was pretty smart.… but to make them all beady and pretty is a GREAT idea!
Dude. Brilliant. I've never beaded anything in my life, but I think you've just inspired me to start. Thanks!!!
Brilliant!
Thanks for sharing.
Thanks, Turtlegirl - I've been wanting to make some and just never got around to figuring out how I wanted to go about them. Now, thatnks to you, I don't have to figure anything! :o)
wow, this is pure genius! So handy with the beading tools, and she knits too! :)
Wow, I'm gone a week and this is what I come back too. Pure genius in row counting, and you frogged something. It brings a tear to my eye. I've missed you.
You rule! This might help me to curse with less frequency during lace knitting!
Well, nah, but I'll have something pretty to look at!
That is a cool tool! I'll have to get out my beads and make one. Thanks for writitng that up.
This is the best idea ever! I'm off to make one for my current 8 row patterned socks. Thanks for the tute.
You rule!!
wow, those are so cool! I'm going to send this to my mom, who makes jewelry sometimes, in hopes that Santa Claus will hear about it. ;-)
And thanks for the lovely compliment on the sweater. It's a very enjoyable knit and goes pretty quickly.
Hey Cristi - we should have a beading party when you get up here :)
Holla back!
Yay! Nice job!! :)
Those are such a fantastic idea.
Love them! I have a request for the visualization impaired (namely, me)...if you have time, could you post a picture of the marker in action on your needles? I'm having a hard time seeing how the loops are supposed to sit on there. Thanks!
Technical question for you. How are you securing the cuts on those rings and wire links so they don't snag on the working yarn?
Neat! I need some of these so I can knit lace without losing my place and messing up the whole repeat (grumble, grumble) How clever!!!
wow, just wow
great idea- esp with the adjustable lenghts. I tried these straight away but just cant seem to get the loop right- even after watching ripple attempt to steal the screen in your video! I may have to do a swap with you for some :)
oh and congrats on making the craft blog- i was very excited for you
I think it's a great idea, already inspired to have a go...now for some bead shopping.
Ooooooh... these make me want to squee, they are so cool! I love, love, love them!
Great idea! Sure beats my notepad and pencil. Thanks for the easy to understand tutorial.
I want to thank you for doing this. As you can read in my post just today I was searching for the row counters I got at Knit Picks.Nada, but you came up and now I'm getting out my tools to make a swap pal one. Thank you so much!
Post a Comment